How to Measure Bottle Dimensions

Table of Contents

Accurate bottle measurements are critical in packaging design and filling operations. Precise dimensions (height, diameters, neck finishes, etc.) ensure that closures fit correctly, labels align properly, and bottles pack efficiently in cartons or on production lines. In practice, measuring errors can lead to misfits (leaks, cap jams) or regulatory noncompliance (under- or over-filled bottles). For example, many regulations require tight fill tolerances – a standard 750 mL wine bottle must be filled to within ±2% of nominal volume. In industries from food & beverage to cosmetics, engineers rely on dimensional specs for QC and design. Measuring bottle dimensions systematically – not just volume – affects everything from filler calibration to consumer satisfaction.

Necessary Tools

  • Digital calipers or micrometers – For precise diameter and neck-thread measurements. Calipers (accurate to 0.01 mm) are essential for small features like neck threads.
  • Measuring tape or ruler – For overall height and body circumference. Flexible tapes can wrap around the bottle; rigid rulers work if the bottle is laid on its side.
  • Graduated cylinder or measuring jug – To determine fill volume. After filling the bottle, pouring the liquid into a graduated cylinder yields its volume.
  • Precision scale (balance) – Optional for fill volume: weigh the empty bottle and then the filled bottle, subtract, and convert mass to volume (using liquid density).
  • Neck/Thread gauge or template – Useful for identifying standard neck finishes. (For example, GPI/SPI finish charts or printable templates can match diameters and thread count.)
  • Calibrated flat surface – A clean, level table or bench ensures height and shoulder measurements are taken without tilt. Always verify measurement tools are zeroed and calibrated.

Measuring Steps

Overall Height

Using digital calipers to measure the bottle’s maximum horizontal width (shoulder diameter).Place the bottle upright on a flat surface. Measure from the base (bottom) up to the highest point of the neck (usually the top of the threads, excluding any removable cap). Use a ruler or tape measure for larger bottles, or calipers for smaller ones. Ensure the measurement is vertical and not angled – the bottle must be fully upright. Record this “maximum height” in millimeters. (For very tapered or curved bottles, measure from base to top along the centerline.) Always double-check the height with a second reading.

Body Diameter (Maximum Width)

For round bottles, measure the body diameter at its widest point. This is typically across the shoulder or mid-body. Two methods are common:

  • Direct diameter measurement: Use calipers horizontally across the bottle’s body. Align the caliper jaws so they grip the widest cross-section of the bottle (usually shoulder-to-shoulder). Measure perpendicular to the axis of the bottle, not at an angle.
  • Circumference method: Wrap a flexible tape measure around the bottle’s body at its widest band. Read the circumference and calculate diameter via D=Circumference/πD = \text{Circumference}/\pi. (For example, a 150 mm circumference corresponds to about 47.7 mm diameter.) A simple alternative is to wrap a strip of paper around the bottle, mark the overlap point, then measure that length with a ruler.

If the bottle is square or irregular, measure across the intended label panel or the two principal axes (width and depth). Again, use the maximum of these for design reference. Record the diameter (or both width and depth) in millimeters.

Neck Diameter (“T” Dimension)

Measuring a bottle’s outside neck diameter (the “T” dimension) with a caliper.
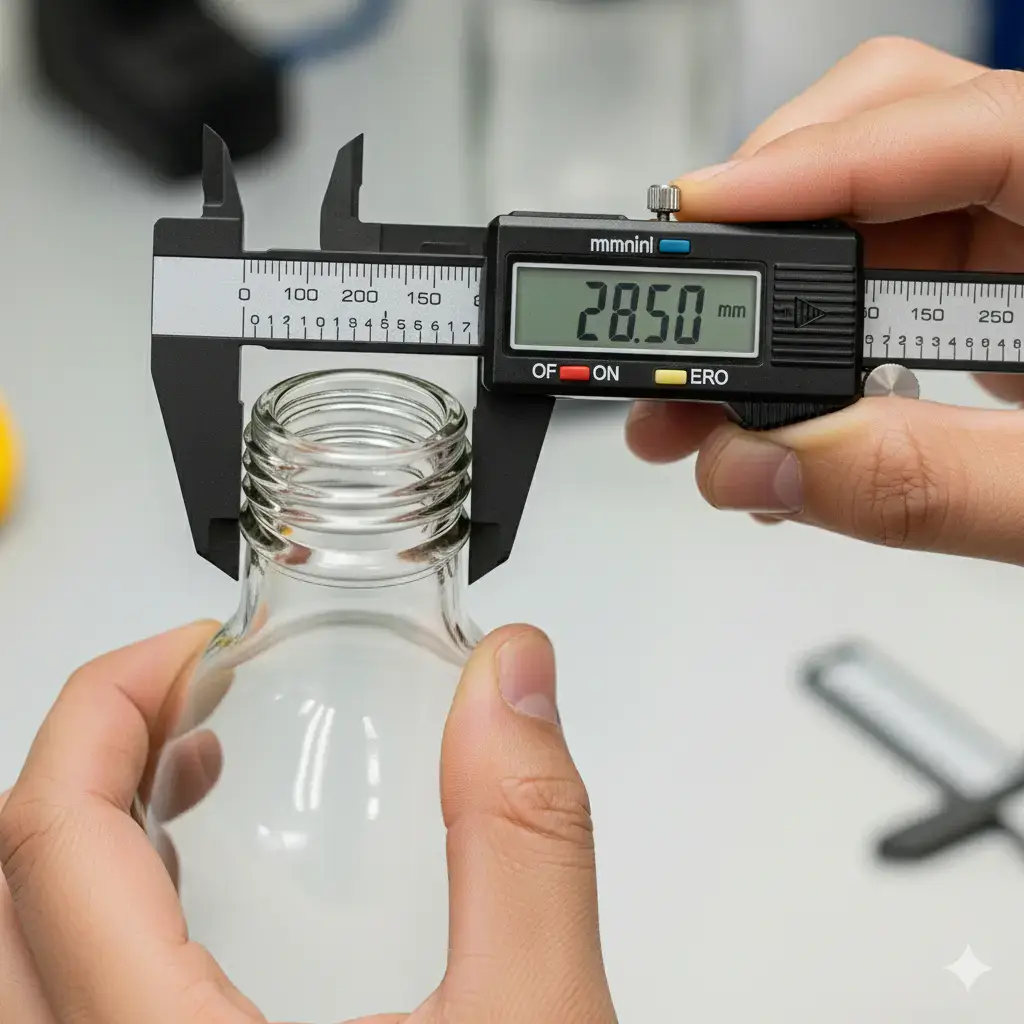
The outside diameter of the threaded neck (the “T” dimension) is key for closure fit. Use the outer jaws of a caliper to measure across the outermost edges of the neck threads. Do this at the parting line where two halves of the mold meet (avoiding any neck support ring below the threads). In practice, align the caliper jaws so they just touch the peaks of opposite threads on the neck. Be careful not to include the support ring or any plastic flash below the threads – the caliper should only span the threaded section. That measurement (in mm) is the first number in the neck finish code. Industry standards define the first number as the outside neck diameter including threads. For example, a bottle whose neck measures 38 mm across its threads has a 38-mm neck finish (e.g. a 38/400 or 38/405 finish).

Identify Neck Finish and Thread Details

Bottle neck finishes are designated by a two-part code (e.g. “28/410” or “38-400”). The first number (already measured above as “T”) is the neck’s outer diameter in millimeters. The second number encodes the thread style and number of turns. To determine it:

  • Count thread turns: Rotate (or inspect) the closure thread around the neck. A “400” finish means 1 full turn of thread (360°). A “410” is 1.5 turns (one full + 180° more), a “415” is 1.25 turns, etc. For example, a 28 mm neck with one and a half turns is a 28/410 finish. Likewise, a 38 mm neck with one full turn is 38/400. Use any calibrated neck gauge or template if available.
  • Measure thread pitch height (S dimension): The S dimension is the distance from the top of the neck finish to the top of the first thread. Measuring S (with calipers) can confirm closure engagement depth. Place one caliper jaw at the very top surface of the neck finish and the other at the crest of the first thread.
  • Other neck dimensions: You may also record: the “E” dimension (the outer diameter of the neck just below threads) and the “I” dimension (the inner diameter/opening of the neck). The E and I dimensions determine thread depth and inner clearance. For most filling operations, at least note the I-dimension to ensure filling tubes or pump spouts fit.

In summary, after measuring T (outside thread diameter) and counting thread turns, express the neck finish as “T/XXX”. For example, “28/410” means a 28 mm thread diameter and a 410-style (1.5-turn) thread. Industry guidelines by GPI/SPI define these finishes to ensure cap compatibility.

Fill Volume (Liquid Capacity)

Measuring the bottle’s fill capacity is straightforward with water (or the product liquid) and a measuring container. Two common methods:

  • Volumetric pour: Fill the bottle to the specified fill line or brim (with any production cap or stopper applied if needed). Carefully pour the contents into a graduated cylinder or calibrated jug and read the volume in milliliters. This yields the true liquid capacity.
  • By weight: Weigh an empty bottle (tare weight) and then weigh the bottle filled with water. The mass of water (in grams) divided by water density (≈1 g/mL at 4°C) gives volume. (E.g., 250 g of water ≈250 mL.) Ensure you compensate for temperature (water expands/contracts with heat).

Record the fill volume and ullage (headspace) if needed. Always note the temperature during volume measurements, as liquids (especially warm or cold) can change in volume. Verify that the filled volume meets any legal or specification limits (for example, a 750 mL bottle often has only ±2% allowable deviation). It’s good practice to repeat the volume fill test at least twice to confirm consistency.

Recording and Standardizing Measurements

e.g. ISO 17025-calibrated equipmentTo ensure consistency: always use the same units (typically millimeters and milliliters). Label each measurement clearly (for example, “Bottle 38 mm T, 400 finish” or “Height: 150.2 mm”). Note which side of the bottle was measured if asymmetrical. Calibrate measuring tools regularly: zero your calipers before each series of measurements, and check tape measures for stretch. When measuring, work on a level bench and double-check each reading for repeatability. It’s common practice to take multiple readings (e.g. three times) and average them if the bottle shape is irregular. Document the date, instrument ID, and temperature if relevant. Proper documentation and calibration traceability (e.g. ISO 17025-calibrated equipment) are key for quality control in manufacturing.

Relevant Standards and Guidelines

Several industry standards inform bottle measurement practices. For example, ASTM D2911 is a standard specification for plastic bottle dimensions and tolerances (up to 18.9 L) that covers thread configuration and body dimensions. For neck finishes, the Glass Packaging Institute (GPI) and Plastics Industry Association (SPI) publish the nominal neck finish codes (e.g. 38/400) and associated tolerances. (These are voluntary standards, but widely used for cap/bottle compatibility.) Other relevant ASTM or ISO standards address related concerns: ASTM D999 and D4169 deal with shipping container performance (important for packaged bottles), and ISO 13302 addresses packaging’s effect on food sensory quality. While not directly about dimensioning, such standards underscore the importance of precise fill and packaging geometry for product safety and compliance.

Best Practices and Common Errors

  • Zero and calibrate instruments: Always zero digital calipers with jaws closed before measuring. Forgetting to do so can offset every reading. Periodic calibration against gauge blocks ensures long-term accuracy.
  • Use light, consistent pressure: Squeeze caliper jaws gently. Excessive force can deform plastic bottles or crush caps, skewing results. Maintain a steady feel – just enough to hold the part without slipping.
  • Align carefully: Make sure caliper jaws are flat and flush on the surface being measured. Never angle or tilt the calipers, as skewed contact gives false readings. For example, always measure diameters across the true centerline of the bottle.
  • Measure flat: Always rest the bottle on a level surface and measure vertically or horizontally as intended. Avoid sagging or tilting the bottle when using height gauges or tapes. (For shoulders, measure the maximum width horizontally rather than at an angled view.)
  • Repeat and average: Take each measurement (especially diameters) at least twice or at multiple points around the bottle. Irregular shapes or manufacturing variability can cause one-off errors. Averaging or noting the range helps spot anomalies.
  • Document conditions: Record room temperature and bottle temperature if measuring volume, since liquids and plastics change size with temperature.

By following these steps and precautions, packaging engineers can obtain reliable bottle dimensions for design, filling, and quality control.

FAQs about Measuring Bottle Dimensions

Transparency is the cornerstone of our Yundu team. That’s why below, you can find the most common questions and answers we receive surrounding our blister packing machine.

Accurate bottle measurements ensure proper closure fit, consistent filling, and smooth packaging line operations. Incorrect measurements may cause leaks, label misalignment, or regulatory noncompliance, which can result in costly recalls or production downtime. Precision in bottle dimensions supports product quality, safety, and customer satisfaction across industries.

Essential tools include digital calipers, rulers or measuring tapes, graduated cylinders for volume, precision scales, and neck finish gauges. Calipers provide accuracy for diameters and threads, while cylinders and scales help confirm volume capacity. Using calibrated tools ensures reliable and repeatable results that meet industry and regulatory standards.

Place the bottle on a flat surface and measure from the base to the top of the neck threads. Ensure the bottle is upright and the ruler or caliper is vertical, not angled. Record the measurement in millimeters. Always double-check for accuracy, especially if the bottle has a sloping or irregular neck.

The “T” dimension is the outer diameter of the bottle neck across the thread peaks. It is the first number in the neck finish code (e.g., 38/400). Accurate T dimension measurement ensures the correct closure size is selected, preventing leaks and ensuring compatibility with capping machinery on the production line.

Bottle neck finishes follow standard codes such as 28/410 or 38/400. The first number indicates the neck’s outer diameter (T dimension in millimeters), while the second represents thread style and turns. Use calipers to measure diameter and count thread turns, or compare with GPI/SPI industry charts for confirmation.

Fill the bottle with water to the intended fill line, then pour into a graduated cylinder to read the volume. Alternatively, weigh the filled and empty bottle and calculate volume using liquid density. Record results in milliliters, ensuring temperature is noted, as liquid expansion or contraction affects volume accuracy.

Key references include ASTM D2911 for plastic bottle dimensions, GPI/SPI guidelines for neck finishes, and ISO 13302 for packaging effects on food quality. ASTM D999 and D4169 address shipping performance. These standards provide measurement methods, tolerances, and definitions, ensuring global consistency and compliance in bottle design and packaging.

Typical errors include not zeroing calipers, applying excessive force, measuring at an angle, or recording values in inconsistent units. Irregular bottles often require multiple measurements averaged for accuracy. Neglecting tool calibration or ignoring environmental factors like temperature can also result in inconsistent or misleading measurement data.

Calibration should be performed regularly, depending on usage frequency and company quality standards. For critical packaging measurements, digital calipers and precision scales are often calibrated quarterly or semi-annually. Regular calibration ensures traceability to standards like ISO 17025 and maintains accuracy required for consistent production and quality control.

Yes, irregular bottles can be measured using calipers, flexible tapes, or 3D scanning if needed. Measure the maximum width, depth, and height, and record dimensions from consistent reference points. For quality control, repeat measurements at multiple points and average results. Document all values clearly to avoid misinterpretation during design or filling.

Share The Post Now:
Picture of Hey there, I’m Daisy

Hey there, I’m Daisy

I’m the Sales manager of Yundu. We have been helping manufacturing industries increase their productivity and capacity with our advanced filling machines for over 20 years.

Have questions? Reach out to us, and we will provide you with a perfect solution.

Related Articles

Magnetic Pump Filling Machine YD-2-2

What Is a Benchtop Filling Machine?

Learn everything about benchtop filling machines — features, types, benefits, and how Yundu provides the best compact filling solutions for your business.

pillow pouch

What is a Pillow Pouch?

Learn what a pillow pouch is – pillow-shaped, 3-sided sealed packaging made with durable materials for food products. Discover benefits, uses & comparisons.

What Is a Gusseted Bag

What Is a Gusseted Bag?

Learn about gusseted bags: flexible packaging pouches with extra panels. Explore their types, materials, benefits, manufacturing and packaging applications.